Saturday, September 28, 2013

Wanted: Nail Polish

My birthday is coming up, and I'm super excited! Now, my least favorite part of birthday parties is, well, coming up with presents. I hate getting an "I don't know" from the birthday girl, so I should be prepared, right? So, welcome to the Wanted List. Today's section? Nail Polish!


  1. Essie Nail Polish in After School Boy Blazer - $8.00
  2. China Glaze Nail Lacquer in Charmed I'm Sure - $3.99
  3. OPI Nail Lacquer in Peace, Love, and OPI - $9.00 
  4. Essie Nail Polish in For the Twill of It - $8.00
  5. Essie Nail Polish in The Cab-Ana - $8.00
  6. Essie Nail Polish in Hip-Anema - $8.00
  7. Sally Hansen Complete Salon Manicure in Blue My Mind - $7.99
  8. Revlon Scented Nail Enamel in Ocean Breeze - $4.99
  9. Givenchy Le Vernis Intense Color Nail Lacquer in Rose D'Exception - $20.00
  10. e.l.f. Nail Polish in Coral - $2.00 
  11. deborah lippmann Nail Color in Happy Birthday - $19.00
  12. deborah lippmann in Lady Sings the Blues - $19.00
  13. Nicole by OPI in Rich in Spirit - $7.99
  14. Zoya Nail Polish in Gia - $8.00
  15. Essie Nail Color in Size Matters - $7.79
  16. Chanel Le Vernis Nail Colour in Elixir - $27.00 
  17. China Glaze Autumn Nights Collection in Queen B - $6.79
  18. JINsoon Nail Polish in Obsidian - $18.00
  19. Marc Jacobs Enamored Hi-Shine Nail Lacquer in Ultraviolet - $18.00
  20. Chanel Le Vernis in Rouge Moire - $27.00
  21. CoverGirl Outlast Stay Brilliant Nail Gloss in PeekABoo - $4.94
  22. deborah lippmann in Do The Mermaid - $19.00
  23. L'Oreal Colour Riche Nail Polish in Miss Pixie - $5.99
  24. Zoya PixieDust Nail Polish in Destiny - $9.00
  25. RGB Nail Polish in Pool - $18.00
  26. Julep Nail Colour in Martha - $14.00
  27. Sally Hansen Diamond Strength No Chip Nail Colour in Diamonds and Rubies - $5.49
  28. Essie Nail Polish in Bottle Service - $8.00
  29. Essie Nail Polish in Sequin Sash - $8.00
  30. Butter London Nail Lacquer in Blagger - $15.00
  31. Butter London Nail Lacquer in All Hail the Queen - $15.00
  32. Butter London Nail Lacquer in Hen Party - $15.00
  33. Butter London Nail Lacquer in No More Waity, Katie - $15.00
  34. deborah lippmann Glitter Nail Colour in Jewel Heist - $19.00
  35. Butter London Nail Lacquer in 3 Free - $15.00
  36. NARS Nail Polish - $19.00
  37. Essie Nail Polish (in Blues) - $8.00
  38. Essie Nail Polish in St. Lucia Lilac - $8.00
  39. Essie Nail Polish in Mirror Metallics - Good as Gold - $8.00
  40. deborah lippmann Nail Color in Boom Boom Pow - $20.00
  41. Essie Top Coat in LuxEffects - $8.00
  42. Essie Ridge Smoothing Base Coat - Fill The Gap - $10.00
  43. deborah lippmann Filler Base Coat - $20.00
  44. deborah lippmann Nail Color in Today Was a Fairytale - $20.00
  45. Dior Nail Enamel in Vernis' - Mystic Metallics - $24.00
  46. Ciate Paint Pot in Sand Dune - $15.00
  47. Ciate Paint Pot in Halo - $15.00
  48. Ciate Paint Pot in Access All Areas - $15.00
  49. Ciate Paint Pot in Kiss Chase - $15.00
  50. Ciate Paint Pot in Spending Spree - $15.00
I hope you're inspired by these 50 nail colours - enjoy! 


Obsessions: Washi Tape

I am super excited to announce that last night I bought some washi tape! I got "Scotch Expressions Washi Tape," at Staples. They were even on sale. For a cheap person like me, that was awesome.
For those that don't know, washi tape is kind of the new obsession for many different people - DIY Blogs have been exploding with washi tape creations. I have gathered a list of my favorite washi tape creations. Let's get started!

1. Make little washi tape flags - so adorable! 

thenaturalweddingcompany.co.uk

2. Transform your keyboard! 

Her New Leaf

3. Decorate a notebook your way! 

u-createcrafts.com

4. Washi tape your furniture! 

Shelterness

5. Washi taped chopsticks - yes! 

bywilma.com

6. Make an iPhone case. 

wanderrgirl.com

7. Make washi tape flowers! 

American Crafts Studio Blog

8. Washi tape magnets - so cute! 

All the Memories

9. Washi tape cards - super creative! 

Omiyage Blogs

10. Washi tape ornaments - brilliant!

the sweetest occasion

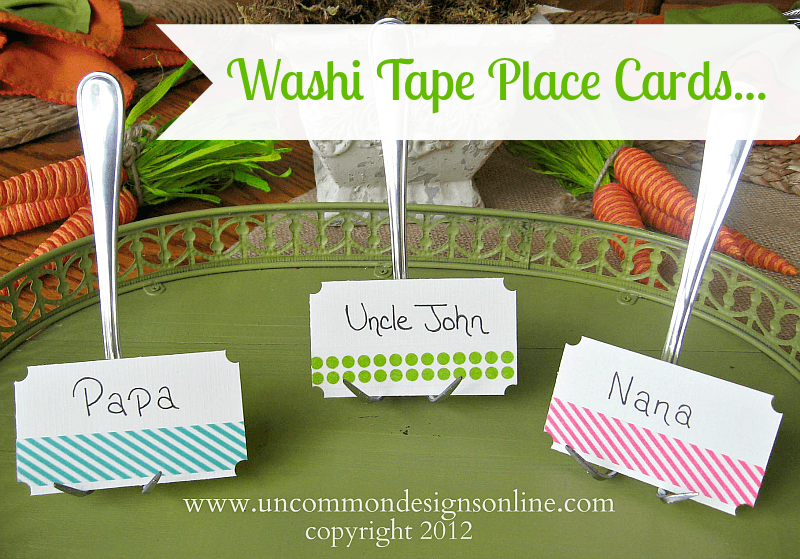
11. Washi tape place cards - a simple way to make your party amazing!

Uncommon Designs

12. Washi tape laptop cover - simple and creative!

Apartment Therapy

13. Washi tape wrapping paper and tags - simply amazing! 

Poppy Talk

14. Washi tape bracelets - super cool! 

Delicate Construction

15. Washi tape bows - the ultimate DIY craft. 

i am doe


That's all for today! I hope that inspired you to make your own washi tape creations - I know I am! Have a great day! 


Thursday, September 26, 2013

DIY Beauty: Fruits

If you don't already know, I'm a little bit of a skin fanatic. I have a complex about my skin acne. You can look at this post for tips on how to decrease acne. This post, I'm here to talk about more at-home options for skin-care and beauty. Specifically, the wonderful fruits (or vegetables) that you can use - and they might even be in your kitchen already! Let's get started!
  1. Avocado - One of my favorite foods to eat (yum!), Beautylish swears that avocados help to hydrate your skin. Just mash a couple ripe avocados (1-2), add a tablespoon of honey and apply to your face.  Leave on for 10 minutes and then rinse. You can also use avocados for your hair - combine 1 or 2 ripe avocados, add a tablespoon of honey, and 1 egg (or 2 tablespoons of olive oil). Leave on for 20-30 minutes and rinse. 
  2. Bananas - Apply a slice of banana (rub on) to an acne spot, and in a few weeks, you should start seeing results! Other uses include puffy eyes, dry hands, and your face. Just apply and enjoy! 
  3. Red Grapes - A reoccurring fruit on many, many different articles about Skin-Clearing Fruits, red grapes are both delicious and great for your skin! To make a face mask, try mixing red grapes and white flour to form a paste. Apply to your face, leave on for about 10-15 minutes, and then rinse off. 
  4. Tomatoes DIY Secrets has a brilliant tomato mask that you can use for your face. I myself have "Yes to Tomatoes" Acne Face Wash, so there has to be something about tomatoes, right? 
  5. Lemon - Because of its acid, Lemon is one of the most common fruits (it is a fruit, right?) used to clear skin and give it a glowing look. However, be sure you're careful - you don't want to apply lemon juice to an open wound or cut. 
  6. Papaya - Okay, so I admit. I'm not exactly a huge papaya fan (eating wise). But my dad is obsessed (obsessed) with buying papayas, so when I found out you could make a face mask that was really good for your face out of papaya, I was ecstatic! This article has more on a papaya face mask, along with a couple other fruits. 
  7. Strawberries - Yup, strawberries. Once again, taste good and good for your skin! Yippee! 
  8. Kiwis - Last, but not least, kiwis are a great fruit for your skin. Just mash, apply, and enjoy! 
So that's it for today! Which one are you going to try? Don't forget to check out my other post (link in the first paragraph), which has more face masks that you can try. Have a great day! 
Tuesday, September 24, 2013

Fashion Finds of the Day

Today, I'm here to show my favorite fashion finds. Yay!


  1. All Women Stalk found this gorgeous turquoise tote bag, perfect for pretty much everything. Available for under $15 at Old Navy, I'll definitely be checking this bag out! 
  2. Drop Earrings. Also from All Women Stalk, these earrings are gorgeous. However, they're unavailable now... Nooo~
  3. I have found the cutest boots in the world at H&M. So cute, yes? 
  4. This sweater is so cute - I found it at H&M
  5. Harper's Bazaar has found these gorgeous jean dresses. 
  6. Another spring dress from Harper's Bazaar, this time with gorgeous flowers! I love both dresses! 
  7. Yet another find from Harper's Bazaar, this handbag is so cute! I love the color - it's very pretty! 
  8. A slightly more affordable find from Harper's Bazaar, this Coach bag is absolutely gorgeous. I just love the red. 
  9. Okay, so, slight bag overload, but isn't this so cute? Found by Harper's Bazaar, I am in love with the gorgeous color and design. 
I hope you enjoyed this article of today's Fashion Finds. Thanks, and feel free to leave comments or send me an email at blogjia12@gmail.com. Cheers! 

Sunday, September 22, 2013

Wow Find: Make Your Hair Short

I was just surfing one of the best blogs in the world, A Beautiful Mess, when I came upon a fantastic post on how to make your long hair look short. Of course, I absolutely had to share this with all of you!


  1. Separate your hair into two parts (top and bottom), from your ears (up and down). 
  2. Pin the top part (to get it out of the way.)
  3. Tie the bottom part into a ponytail. 
  4. Twist ponytail into a bun and pin as close to the back of your head as possible. 
  5. Take the top part out and divide into small strands. 
  6. Fold the smaller strands in half (inwards) and pin to your head. 
  7. Use a curler to carefully turn the ends out (to make it look more natural.)
  8. Tada!
I hope that was helpful. I'll definitely be trying this for April Fool's Day and any other day I want to have short hair! Cheers! 

Today's Finds: The Best Tinted Moisturizers, CC Creams, and BB Creams

Lately I've been on the hunt for the perfect tinted moisturizer and BB Cream. Here I have compiled all the Tinted Moisturizers, CC Creams, and BB Creams under $35. Please keep in mind I have not tested these personally. However, once I get around to visiting a couple stores, I'll tell you my personal reviews. However, I have checked each product to make sure it isn't a complete disaster. As always, make sure you do your own research!


  1. L'Oreal Studio Secrets Magic BB Cream - Babble swears by this BB Cream, and it only costs $15! 
  2. e.l.f. Tinted Moisturizer SPF 20 - Well, it's $4. What else can I say? Even if it doesn't work that well, it's kind of four dollars. (Source: Babble)
  3. Clinique Moisture Surge CC Cream SPF 30 - At the higher end of the price range, at $35, Glamour recommends this CC Cream for medium coverage. 
  4. Avon Ideal Flawless Skin Loving Beauty Balm - About $10, with lots of coverage, according to Glamour. 
  5. Garnier Skin Renew Miracle Skin Perfector - With average ratings at 3.6 stars, this BB Cream was a top pick from Total Beauty. For the price of around $14, you could definitely check this out. 
  6. Aveeno Positively Radiant Tinted Moisturizer - Refinery 29, one of my favorite blogs to read, recommends this Tinted Moisturizer by one of my favorite brands, Aveeno. At around $14, the ratings are pretty good at around 4 stars. 
  7. Boots No7 Soft and Sheer Tinted Moisturizer - Next from Refinery 29's list is this tinted moisturizer, which is around $12. The ratings are in the 4 star zone.
  8. Stila Sheer Color Tinted Moisturizer SPF 20 - Getting around the 4.5 star zone, this tinted moisturizer is water-resistant and perfectly sheer. 
  9. Maybelline Dream Fresh 8-in-1 Beauty Balm Skin Perfector - At less than $10, this BB Cream garners reviews at around 3.5 to 4 stars. The price alone is great though, right?
  10. Stila Stay All Day 10-in-1 Beauty Balm - First of all, yes, this BB Cream is $38. However, I kept seeing it on the different websites, so I figured I might as well put it in. The overall reviews are pretty good, at around 4 stars or so. So if you're willing to pay that much, go ahead! 
  11. Lioele Triple the Solution BB Cream (SPF 30/PA++) - A BB Cream from Korea (because we all know the best BB Creams are from Asia), this BB Cream is around $25, and actually got a 9.5/10 stars at Yes Style.
That's all for now. I hope this article helped a little. Feel free to comment your personal reviews for whatever BB Creams, CC Creams, and Tinted Moisturizers you have used, whether they're on this list or not. Thanks! 

Thursday, September 19, 2013

Your Fashion Guide: Part 2

Welcome to Part 2 of Your Fashion Guide! Feel free to check out Part 1 (click).
  1. White eye shadow can make your eyes look bigger. Apply white eye shadow to the inside corners of your eyes to make them appear larger. 
  2. Take a photo with flash. Before heading out, try taking a photo with flash. The flash will help you test if anything is see-through in light. (Source: The Fashion Spot)
  3. Use dishwasher soap to remove stains. "In the case of a stain, attack the underside of the spot with dishwasher soap. It will help break up any foods and oils and help remove the mark." (Source: The Fashion Spot)
  4. Take blood out of your clothes with ice. Grab a piece of ice and put it on the stain - it'll get the blood out! (Source: The Fashion Spot)
  5. Shop for shoes at the end of the day. At the end of the day, your feet are swollen, which will help you know how the shoes you're shopping for will fit after walking around for a long time. (Source: The Fashion Spot)
  6. Ankle straps make you look shorter. The ankle straps cut off your leg, which will make you seem shorter. So...my tip to you? Stay away from ankle straps. 
  7. Blue-based lipstick makes your teeth look whiter. Apparently, it works. Try it out! (Source: She Knows)
That's it for Part 2 of Your Fashion Guide! Have a great day - Cheers! 

Tuesday, September 17, 2013

Your Fashion Guide: Part 1

Welcome to your Fashion Guide - Part 1. This post is the first of my new series. I'll be posting miscellaneous tips to help whatever fashion needs you have. Let's get started!

  1. Have fun accessories. Accessories help add a splash of color and fun to your outfit. Of course, don't go overboard! A fun, bright accessory can really change your outfit.
  2.  Organize your closet. Organizing your closet by clothing type can not only make your closet look better, but it can also make your mornings so much faster! For an extra tip on making your closet look better, try using uniform hangers. 
  3. Have a go-to dress. Dresses are by far the easiest outfit to thrown on and still look put together. Make sure to always have a dress that can work for pretty much any occasion, and your days will be easier!
  4. Nude pumps make you seem taller. Opt for a nude pump that fits your skin color. It'll give the illusion of longer legs!
  5. Turn on the cold water. Right before you step out of the shower, rinse your hair with cold water. It'll help to make your hair glossier and retain the color. 
  6. Double-sided tape is your new best friend. Use double-sided tape to fix a long hem or plunging neckline. Tada! 
  7. Reduce soreness in your legs with a few easy tricks.  DIY Heat Pads: Fill a plastic bag (or any other thing that is microwavable) with rice or dry beans. Microwave. Voila! Second Tip: Elevate your legs to get the blood circulating. 
  8. Check your whites. In the light, some white clothing can be transparent. Avoid an extremely awkward experience and check your white clothing in the light at all angles before leaving the house! 
So that's Part 1 of Your Fashion Guide! Have a great day! 

Monday, September 16, 2013

Tips of the Day: For the Vertically Challenged

Today's Tips of the Day are for the vertically challenged! While I personally can't really relate, I do have quite a few friends who shard their wise bits of knowledge, so I'm here to share them with you! (Don't worry, I'll make sure to do one for those who are vertically gifted, if not a little too gifted.) I've done a bit of research on Style Caster and Style List, so here you go!


  1. Go super short or super long. By super short, I remind you to keep it classy. You can do a miniskirt, but make sure it's not a super miniskirt. For super long, here's what maxi skirts are for! 
  2. Try a top knot. Okay, I'm sure you already know this. But focusing your hair upwards makes you seem taller. Just the same as adding volume to your hair! 
  3. Vertical stripes. Again, pretty straight forward. Vertical stripes = makes you look taller. Not that hard, yes?
So those are my three super quick and easy tips! Tada! 

Thursday, September 12, 2013

Morning Rush: How to Cut Down Your Morning Routine Time


I assure you, I am not a morning person. Granted, I have it a little easier than my sister, who could sleep until two o'clock in the afternoon if you let her, but I can not think in the mornings. So I'm here with some simple tips you can try out to see what can help you spend a little less time preparing in the mornings.

  1. Prepare everything the night before. It really, really, helps when you prepare all your stuff the night before, while you're still thinking. It makes it so you don't forget anything (hopefully), and you spend a lot less time running around trying to find everything you need for the day. If you plan your outfit the night before, it makes your morning go so much faster - no more running around searching for an outfit! In addition, your outfits won't look as thrown-together, which definitely isn't a good look.
  2.  Create a To-Do list for yourself. I usually write a list of things to do in the morning and during the day in the evening right before I sleep, and then I tape it onto my mirror so I can read it while I'm brushing my teeth. It helps with memorization. You can put what outfit to wear, what you need to remember to do during the day, and some positive encouragement.
  3. Consider showering in the evening. I have always showered in the evening, and I find it helps a lot to do that. I'm all about doing everything in the evening, so you don't have to think in the morning. In addition, considering washing your hair every other day, instead of every day. It's actually better for your hair, as over-washing can lead to a dry scalp or lice.
  4. Find out your essential beauty items - cut the others out. If you're running late, there's really no time to do a full makeup routine. Instead, find out what makeup items are essential for you to look good. For me, it's concealer, eyeliner, and mascara (plus acne cleanser and lotion).
  5. Organize your beauty products. Don't spend all your time running from your bathroom to your bedroom to wherever else you keep your beauty products. Keep everything you need in one place, and it'll save a ton of time (and energy).
  6. Have a go-to outfit. A dress is the easiest article of clothing to throw on, so I recommend having a back-up dress in your closet for the times you're really running late and don't have time to think of anything else. If not a dress, then just come up with an outfit that you can just throw on. Jeans, anyone?
  7. Consider buying facial wipes. Facial wipes make it super easy and fast to clean your face - definitely an investment worth thinking of. And they don't even cost much!
Hopefully those helped a little. If all else fails, set multiple timers in your bedroom and bathroom to keep yourself on track! Cheers, and have a great day!

Wednesday, September 11, 2013

Fashion On A Budget: The Best Cheap Stores to Shop


While I would love to be rich, unfortunately, I'm not. So if I want to be fashionable, I have to search for the best bargains. If anything is over $25, I always think it's really expensive, just to give you an idea of how cheap I am (not ashamed to admit it!). Obviously, dresses and shoes are a little different, but... I've compiled a list of my favorite stores to shop at. Hopefully it'll help you too!

  1. Forever 21 - I'm sure most of us have heard of this store. Probably one of the most popular cheaper stores (especially with those my age), Forever 21 has a very large selection, all color-coded in different parts of the store. Unfortunately, the racks do tend to be a little packed, so it does take a while to find clothes. But if you're a talented shopper with a good eye, you should find some great pieces at Forever 21.
  2. Kohl's - I personally have found quite a few clothing items at Kohl's. There are a couple displays that are slightly expensive (for my tastes, maybe not for yours), but overall Kohl's is a pretty good quality store for its prices.
  3. Ross Dress for Less - A couple months ago, a new Ross Dress for Less opened up really close to my house, so obviously my family checked it out. I really love the huge selections of dresses the store has. Though to note, the racks are a bit unorganized. As far as other clothing goes, there isn't too much.
  4. Marshalls - I'm sure we've all seen the commercials. Nothing else needed, yes?
  5. T.J. Maxx - Owned by the same company as Marshalls (see above), T.J. Maxx has some super cute clothes - just look at their website! Though not exactly under $30, they do have quite a few fashionable clothes for under $50, including dresses.
  6. Target - Definitely well-known right now, especially with the new collab - Phillip Lim for Target - coming out soon.
I'll update as I come up with more, but that should be a good start for you guys. Good luck, and happy shopping!

Monday, September 9, 2013

Glitter, Glitter, and More Glitter!


Recently I went to my local CVS (about a half hour walk - thank you!), and bought glitter nail polish ("Confetti Fun - Nicole by OPI)! Yay! I absolutely love my glitter nail polish. I know, I know. You're all probably thinking, "How could she not have glitter nail polish already?! It's a horror!" But I'm a procrastinator, so... Here am I, months after I planned on getting glitter nail polish. But at least I have it now, right?

The amusing thing is, I don't actually have trouble getting my glitter nail polish off. Maybe it's just my type of glitter nail polish (definitely consider investing in a better brand). But I did a base gradient with blue and purple (with a makeup sponge - my first try, it was awesome!), and then added a regular glitter gradient on the tips. And I used my nail polish remover (Sally Hansen), and it took it off without any problems. So I don't really know... I just used a Q-Tip and my remover.

If you don't already have glitter nail polish, here's my reasons why you should totally invest in glitter nail polish - and it's not even a big investment!

  1. It covers your mistakes. If your nail chipped, no problem! Just do a simple glitter gradient, starting over the area the mistake, and no one will ever know!
  2. It adds a simple level to your nail polish. Even a single solid color can become eye catching with glitter! Just add glitter, and you're good to go! It's a super simple, super easy manicure that'll look amazing.
  3. It's super easy! Like, really easy. Trust me.
I hope you guys have fun with your glitter nail polish! Cheers, and have a great day!

Saturday, September 7, 2013

DIY Hairstyles: Flat Iron Curls and Waves

I love my hair (it never frizzes!), but it also never curls. So when I need to curl my hair, what do I do? Luckily, A Beautiful Mess (one of my favorite blogs!) has the perfect tutorial (thank you)!  Let's go~

(Source: A Beautiful Mess)

2
Directions (paraphrased by moi):
  1. Separate your hair into three different sections. (Or however many sections you want.)
  2. Take your straightener (or flat iron) and clamp it on one section of hair. (Start where you want your waves to begin - probably somewhere halfway.)
  3. Turn your straightener (or wrap your hair around the straightener) clockwise (if you're curling on the right side), slowly. Make sure every part of your hair is heated - if your hair doesn't turn out very curly, curling more slowly will probably do the trick.
  4. Repeat for each section, and run your fingers through your hair (to break up the individual curls).
Tada! I hope you have fun. From experience, it takes a while to do this, so don't get discouraged. Also, it's recommended you use some sort of heat protection spray, so you don't damage your hair. Practice makes perfect! I wish you good luck!

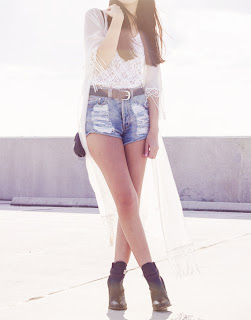
Outfit of the Day: Simply Casual (but fashionable!)

Welcome to Jia's Outfit of the Day! Today's theme is Simply Casual (but fashionable!).


...
(Source(s): Pinterest)
Tada! Hope you like today's post, and make sure you follow me on Twitter, Instagram, and Pinterest - click the buttons on the right side or just find me @blogjia12! Have a great day! 

Friday, September 6, 2013

Tips of the Day: Tricks and Treats

Jia's Tips of the Day:
  1. White Eye Shadow
    • Apply in inside of eyes (around tear ducts) 
    • Apply above cheekbones
  2. Eyeliner
    • To emphasize your eye's natural shape, only apply eyeliner to the end of the crease (your double eyelid).
    • Apply the eyeliner in long dashes (that touch) as close to the upper lash line as possible.
  3. Mascara/Eye Lashes
    • Curl your eye lashes - consider investing in a quality eye lash curler with pads
    • Apply mascara at the base of the lashes, then apply to the entire lash.
  4. Hair
    • Right before you jump out of the shower, rinse your hair with cold water for a second. (I do it - it makes your hair glossier.)
    • Air dry! If you absolutely have no time to air dry, try to wait as long as possible, and don't use heated air.
    • Heat = BAD (That's all I have to say, right?)
    • Don't rub your hair dry
Those are my words of advice for you guys! I hope you have fun, and have a great day!

Thursday, September 5, 2013

DIY Nail Designs: Tutorials, Tips, and Tricks

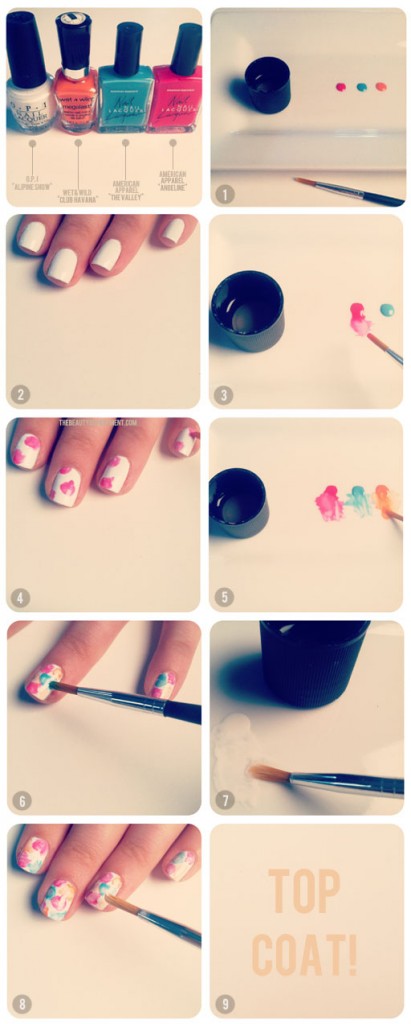
Nails, nails, and nails! I love doing my nails. Especially since it's super fun, doesn't cost any money, and makes my nails pretty! Score! So I'm here to give you guys simple DIY nail designs, along with my tips and tricks.

1. Gradient Nails (Source: Chalkboard Nails)


2. Watercolor Nails (Source: Fashion Diva Design)

12 Amazing DIY Nail Art Designs

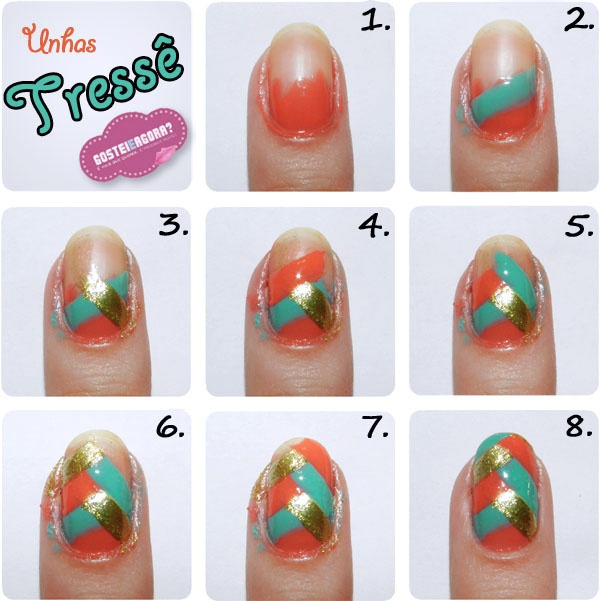
3. Herringbone Nails (Source: Fashion Diva Design)


23 Creative Nails Tutorials

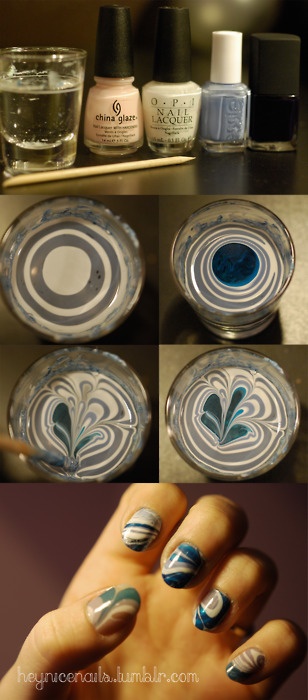
4. Water Marble Nails (Source: Fashion Diva Design)

23 Creative Nails Tutorials

5. Gold Sharpie Nail Art - Source: Fashion Diva Design)

28 Nail Tutorials Best Ideas For This Summer
Tada! Hope you have fun experimenting!

DIY Hairstyles: Simple Up-Dos


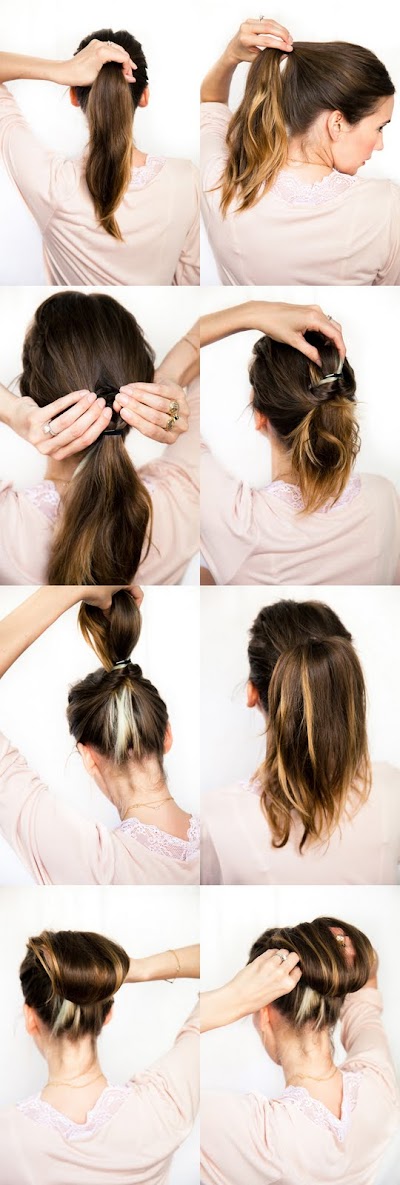
You're in a rush, but your hair is super greasy! What do you do?! Jia's here to help with simple up-do hairstyles you can do in a little bit. Yay!

1. Braided Bun (Pictorial)

2. Holiday Bun- http://parlordiary.com/2011/12/12/holiday-hair-2/


3. Braided Up-Do (If you know how to do a regular braid, this is super easy!) - http://www.refinery29.com/braids-hairstyles-diy-updo-how-to#slide-1

braided-hairstyle-10

4. Top-Knot Pictorial (totally trying this!) - http://joannagoddard.blogspot.com/2012/06/perfect-knot.html

5. Chestnut Bun (Pictorial + Directions) http://joannagoddard.blogspot.com/2011/06/do-your-own-wedding-hair-chestnut-bun.html


That's all for now! I hope you guys have a ton of fun trying these out - I know I will! Cheers!

(Don't forget to follow me @blogjia12 on Instagram and Twitter.)